4 Reasons Why I Made the Switch to DIY Hair Care
I honestly never thought I’d be making my own shampoo and conditioner – I figured I’d leave that to the super-crunchy people (I consider myself to be moderately crunchy). However – I’ve now been doing it for a few months and I am a convert! Here’s why I made the switch to DIY hair care.
1. It’s frugal.
I was paying about $8-9 for a bottle of organic shampoo or conditioner – and you can certainly pay more than that, I always looked for sales! Here’s a breakdown of what I use now and how much it costs.
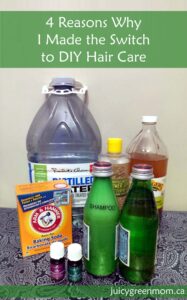
My DIY Shampoo Recipe:
- 1/2 cup Liquid Castile Soap (I like Dr. Bronner’s or Green Beaver)
- 1/2 cup distilled water
- 10 drops essential oil (I like using peppermint – I only use high quality therapeutic grade essential oils)
- pinch of baking soda (optional)
I put all the ingredients into a glass bottle (formerly containing carbonated water) and shake well before using. I use 1-2 capfuls each time. (Note: some bloggers have talked about baking soda being too alkaline to be good for your hair. I make 1 batch of shampoo with and 1 without baking soda, and only use the baking soda when I feel my hair is heavier or oilier. I find that it cuts the greasy feeling leaving my hair softer – however I will update on this if it changes!)
UPDATE: I have now found a recipe that is pH balanced for hair, to avoid the problems with alkalinity. Check it out here (complete with cost breakdown).
My DIY Conditioner Recipe:
- 1 tablespoon apple cider vinegar
- 1 cup distilled water
- 8 drops essential oil (I like using lavender)
Same method as above, but I use 4-5 capfuls each time.
My cost breakdowns (as of 2016):
| Product | Amount | Cost | Amount required | Cost for recipe |
| SHAMPOO | ||||
| Dr. Bronner’s unscented liquid castile soap | 946 ml | $ 18.39 | 125 ml | $ 2.43 |
| Shoppers Drug Mart brand distilled water | 4L | $ 1.69 | 125 ml | $ 0.05 |
| Young Living Peppermint essential oil | 15 ml | $ 24.75 | 0.5 ml | $ 0.83 |
| TOTAL COST | $ 3.31 | |||
| CONDITIONER | ||||
| Filsinger’s Apple Cider Vinegar | 946 ml | $ 7.79 | 15 ml | $ 0.12 |
| Shoppers Drug Mart brand distilled water | 4L | $ 1.69 | 250 ml | $ 0.11 |
| Young Living Lavender essential oil | 15 ml | $ 27.00 | 0.4 ml | $ 0.72 |
| TOTAL COST | $ 0.95 |
Note: I always get Dr. Bronner’s liquid castile soap when it’s 20% off at well.ca, and the apple cider vinegar is frequently on sale as well. Also, I calculated the cost of essential oils based on the assumption that 1 mL = approximately 20 drops.
Based on these recipes, my shampoo lasts approximately 1 month (washing every 1-2 days – I know I should wash less frequently but I have a thing about needing to wash it!), and my conditioner lasts approximately 2 weeks. Assuming that a store-bought shampoo or conditioner lasted me 2 months, my DIY versions are still cheaper at less than $7 for 2 months of shampoo, and less than $4 for 2 months of conditioner.
2. I know what’s in it.
It’s no secret that there is a long list of toxic ingredients to avoid when buying hair products. Making my own ensures that there are no hidden toxic ingredients and I can customize it however I want.
3. It’s easy.
I really do not DIY things that I think are too complicated. As my husband says, my time is also worth money, so if it takes too long to make, I won’t do it. These recipes are so simple that it literally takes a few minutes to measure the ingredients and dump them into the bottle.
4. It makes my hair feel awesome!
My hair is lovely and somehow has become more wavy! (Which is a bit odd for my straight Asian hair – however my dad has curly hair so maybe it was in my genetic code but was never awakened until DIY hair care??) I’ve gotten so many comments about how nice my hair looks. There is a caveat – it took about 2-3 weeks for my hair to adjust to the DIY stuff. I was using natural/organic shampoo and conditioner for several years before doing this switch, but it still took some adjustment time (where my hair felt kind of gross and heavy). If you’re switching from conventional products, the “detox” would likely be longer. But – if you can muscle through those few weeks of detox, your hair, the environment, and your wallet will thank you!
Would you try DIY-ing your own hair care?
(Disclosure: I am a participant in the Amazon Services LLC Associates Program and the Amazon.com.ca, Inc. Associates Program, affiliate advertising programs designed to provide a means for sites to earn advertising fees by advertising and linking to amazon.com & amazon.ca. This post contains affiliate links. If you choose to purchase products via these links, a small percentage of the sale will be given to me at no extra cost to you. Thanks for supporting juicygreenmom.ca!)

That’s great you’ve found such simple and cost effective recipes that work! I think my DIY effort will be toothpaste. There’s a recipe that I’m waiting to try next time I run out. The ingredients are baking soda, hydrogen peroxide, coconut oil, and essential oil. I know it will be cheaper than the natural toothpastes which tend to be quite pricy, and I won’t be buying the non-recyclable plastic tube.
That’s fabulous! And such a good point – that you won’t be contributing to the waste of the toothpaste tubes! I’d love to hear about how you like your DIY toothpaste when you try it – it’s definitely on my list to try.
I remember one summer I was working in a garden with lots of rosemary and I made a hair rinse by steeping a bunch of rosemary in water in a jug in the sun. OMG – I think it was the best experience my hair ever had! it was so soft! I later found out rosemary darkens hair over time so it would be perfect for someone with dark hair.
How cool!!! Thanks so much for the tip! It will be wonderful to try on my Asian hair. I am going to order Rosemary essential oil right away to try in my next batch of conditioner!
You should check the pH of your shampoo, anything too alkaline can really damage your hair even though it feels soft. Read this for more info http:// http://www.thankyourbody.com/ph-balanced-shampoo-recipe/ or this one (which mostly talks about baking soda) http://www.thankyourbody.com/ph-balanced-shampoo-recipe/ and http://eatlocalgrown.com/article/13831-baking-soda-destroyed-hair.html
Hi Katie, thanks for your comment! I am familiar with the links you provided – thanks for sharing them. I have definitely been considering getting some litmus paper to test the pH on what I’m currently using!
Is there a reason you put them in a glass bottle versus a plastic bottle?
Thanks for your question, Lisa! I tend to use glass bottles for anything I make with essential oils – because some essential oils break down petrochemicals (which plastic is made from). This tends to be more of an issue with citrus essential oils, and more of an issue if placed in sunlight. However I also prefer glass overall because of the possibilities of plastic chemicals leaching into whatever product is in the bottle. I hope this helps to answer your question!
With the conditioner recipe. Is that just a spray on after you are out of shower? Or how do you apply it?
I use 4-5 capfuls of the conditioner while I’m in the shower, after I’ve rinsed my hair from the shampoo. I just pour it on my head, work it in with my fingers, and rinse. Just like if you were using a bottled conditioner, just more liquidy!